
Need help choosing a Mate? Use our selection guide!
(won't take more than a minute!)
Find Your Perfect Yerba Mate
Answer a few questions to get personalized recommendations
Loading your recommendations…
Yerba Mate
Yerba Mate
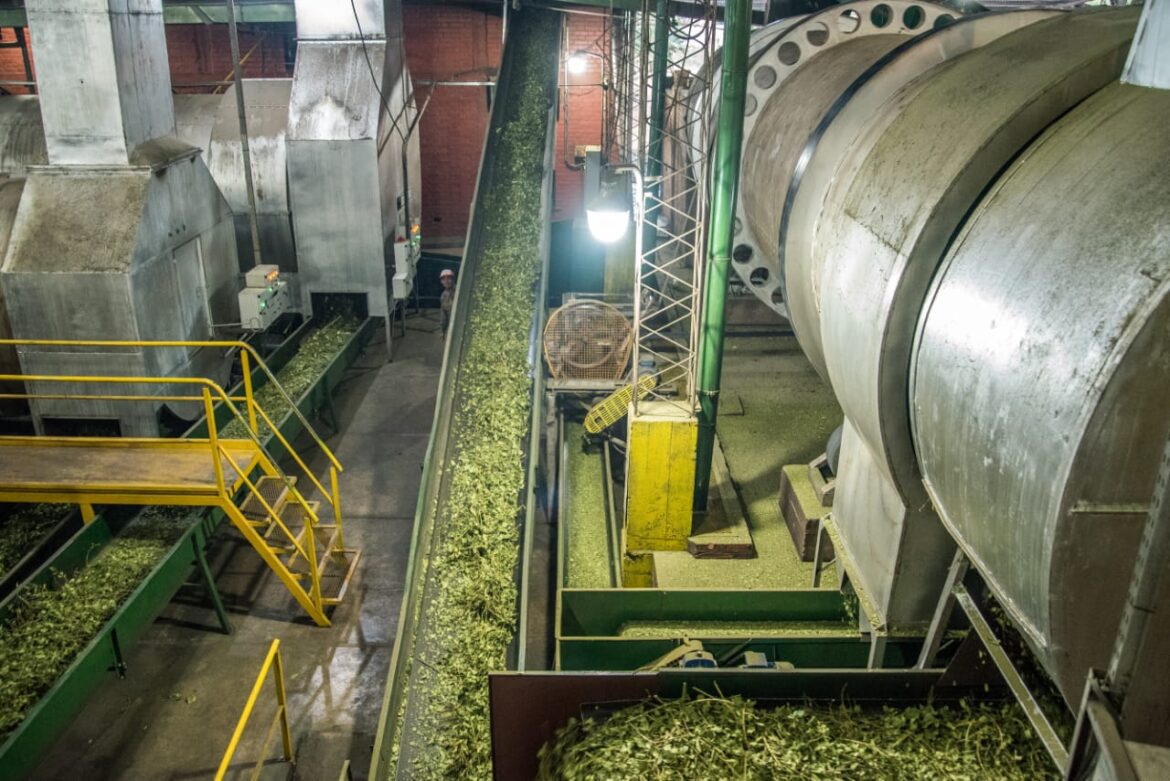
The Art of the "Molienda": Why Not All Yerba Mate Is Created Equal
by Joost Schinkelshoek on May 28 2025
When you first enter the world of yerba mate, you may be overwhelmed by the amount of green leaves. Bags full of green leaves, some dustier than others, some with twigs, some without. “Isn’t it just yerba mate?” you might think. But just like coffee beans or tea leaves, there’s a world of difference in how yerba mate is processed and ground – the molienda – and this has a huge impact on the taste, the strength and even how you prepare it.
Con Palo vs. Sin Palo: The Battle of the Twigs
One of the first distinctions you will encounter is the difference between yerba mate con palo (with twigs) and sin palo or despalada (without twigs).
Con Palo: This variant, popular in Argentina, contains small pieces of the stems (twigs) of the yerba mate plant in addition to the ground leaves. The twigs add a certain mildness and a slightly sweet, woody undertone. The result is often a rounder, smoother mate that is easier to drink for beginners and less likely to get clogged in your bombilla. For example, the yerba mate from the brands CBSé , Playadito and Taragui are 'Con Palo' (with the exception of the sin palo variants of course)
Sin Palo / Despalada: This removes most of the stems, leaving a product that is mostly pure leaf fragments and some dust. This results in a more intense, often more bitter and powerful flavour. Lovers of a strong, robust mate often prefer this. This style is more common in Uruguay and parts of Brazil, and can be found for example in the Canarias brand, or the ' Playadito Despalada '
The Fineness of the Grind: From Coarse to Dusty
In addition to the presence or absence of twigs, the actual fineness of the grind also plays an important role:
Coarsely ground (Molienda Gruesa): This grade has larger leaf pieces and less dust. This produces a clearer infusion and is often easier to prepare without clogging the bombilla.
Finely ground (Molienda Fina): Here the leaves are ground finer. This allows for a faster and more intense extraction of flavors and caffeine, and also results in a more bitter taste.
Chimarrão/Uruguayan Type: Extremely fine, almost powdery, with a bright green color. This is typical of the Brazilian chimarrão and some Uruguayan mates. These require a specific preparation method and a bombilla with a very fine filter (a "spoon bombilla" or "bomba") to avoid a mouthful of dust. The taste is often grassier and fresher.
Experiment and Discover!
The best way to discover the differences is to taste them. Maybe start with an Argentinian con palo ( Taragui , CBSé , Playadito ) for an accessible experience, then move on to a more powerful sin palo ( Canarias ) or a Brazilian chimarrão ( Barao ) if you’re feeling adventurous. Pay attention to the differences in aroma, flavor intensity, bitterness, and how the mate behaves in your gourd.
The world of moliendas in yerba mate is a fascinating aspect that shows how much craftsmanship and tradition is hidden behind this simple green leaf. It is an invitation to discover!
Yerba Mate
Saving a Natural Gourd from Mould
by Joost Schinkelshoek on Apr 30 2024
Think there's mould in your natural gourd? Don't throw it away immediately! With a little effort, you can simply use the gourd again.
First, it is important to be sure that it is mould. It is quite normal for black/green spots to appear in the gourd, left behind by the yerba. You cannot really remove these stains, but they are not bad at all.
The difference with mould is that mould is usually white, fluffy and easy to scrape away. You can see the difference in these photos
Not mould
Mould
Even if it does have mould, the gourd is still salvageable. Here is what you can do to remove the mould:
Fill the gourd completely with boiling water.
Let the water sit in the gourd for about 20 minutes
Pour out the water, and thoroughly scrape the entire surface of the gourd with a spoon so that all the mould is completely gone.
Fill the gourd with hot water again, and leave for another 20-30 minutes.
Dry the gourd well, for example with kitchen paper, and leave it to dry in a well-ventilated place for at least 2 days.
When the gourd is completely dry, you can simply use it again. Make sure you store the gourd dry every time after use, to keep it clean in the future.